
Automating infrastructure deployments with Terraform Cloud and GitHub Actions


In this article, I will continue the discussion from this section and present one way how we can automate our infrastructure and application deployments using Terraform Cloud and GitHub Actions.
As it was mentioned in the other article, we will suppose that our system is composed of the following modules:
- A Node.js Express API.
- Two React clients.
- One PostgreSQL database.
- Our infrastructure code (written in Terraform).
What tools do we need?
We will be using Terraform Cloud as our remote backend for storing our infrastructure state (but not only), and GitHub Actions (together with AWS plugins) for the CI/CD pipeline.
- Terraform Cloud: It manages Terraform runs in a consistent and reliable environment, and includes easy access to shared state and secret data, access controls for approving changes to infrastructure, a private registry for sharing Terraform modules, detailed policy controls for governing the contents of Terraform configurations, and more.
- GitHub Actions: Makes it easy to automate all your software workflows (build, test, and deploy your code right from GitHub).
- AWS for GitHub Actions: Official AWS plugins for GitHub Actions.
Terraform Cloud setup
For setting up Terraform Cloud we will go through the following steps:
- Create your Terraform Cloud account.
- Create workspaces.
- Define environment and Terraform variables.
- Define the working directory.
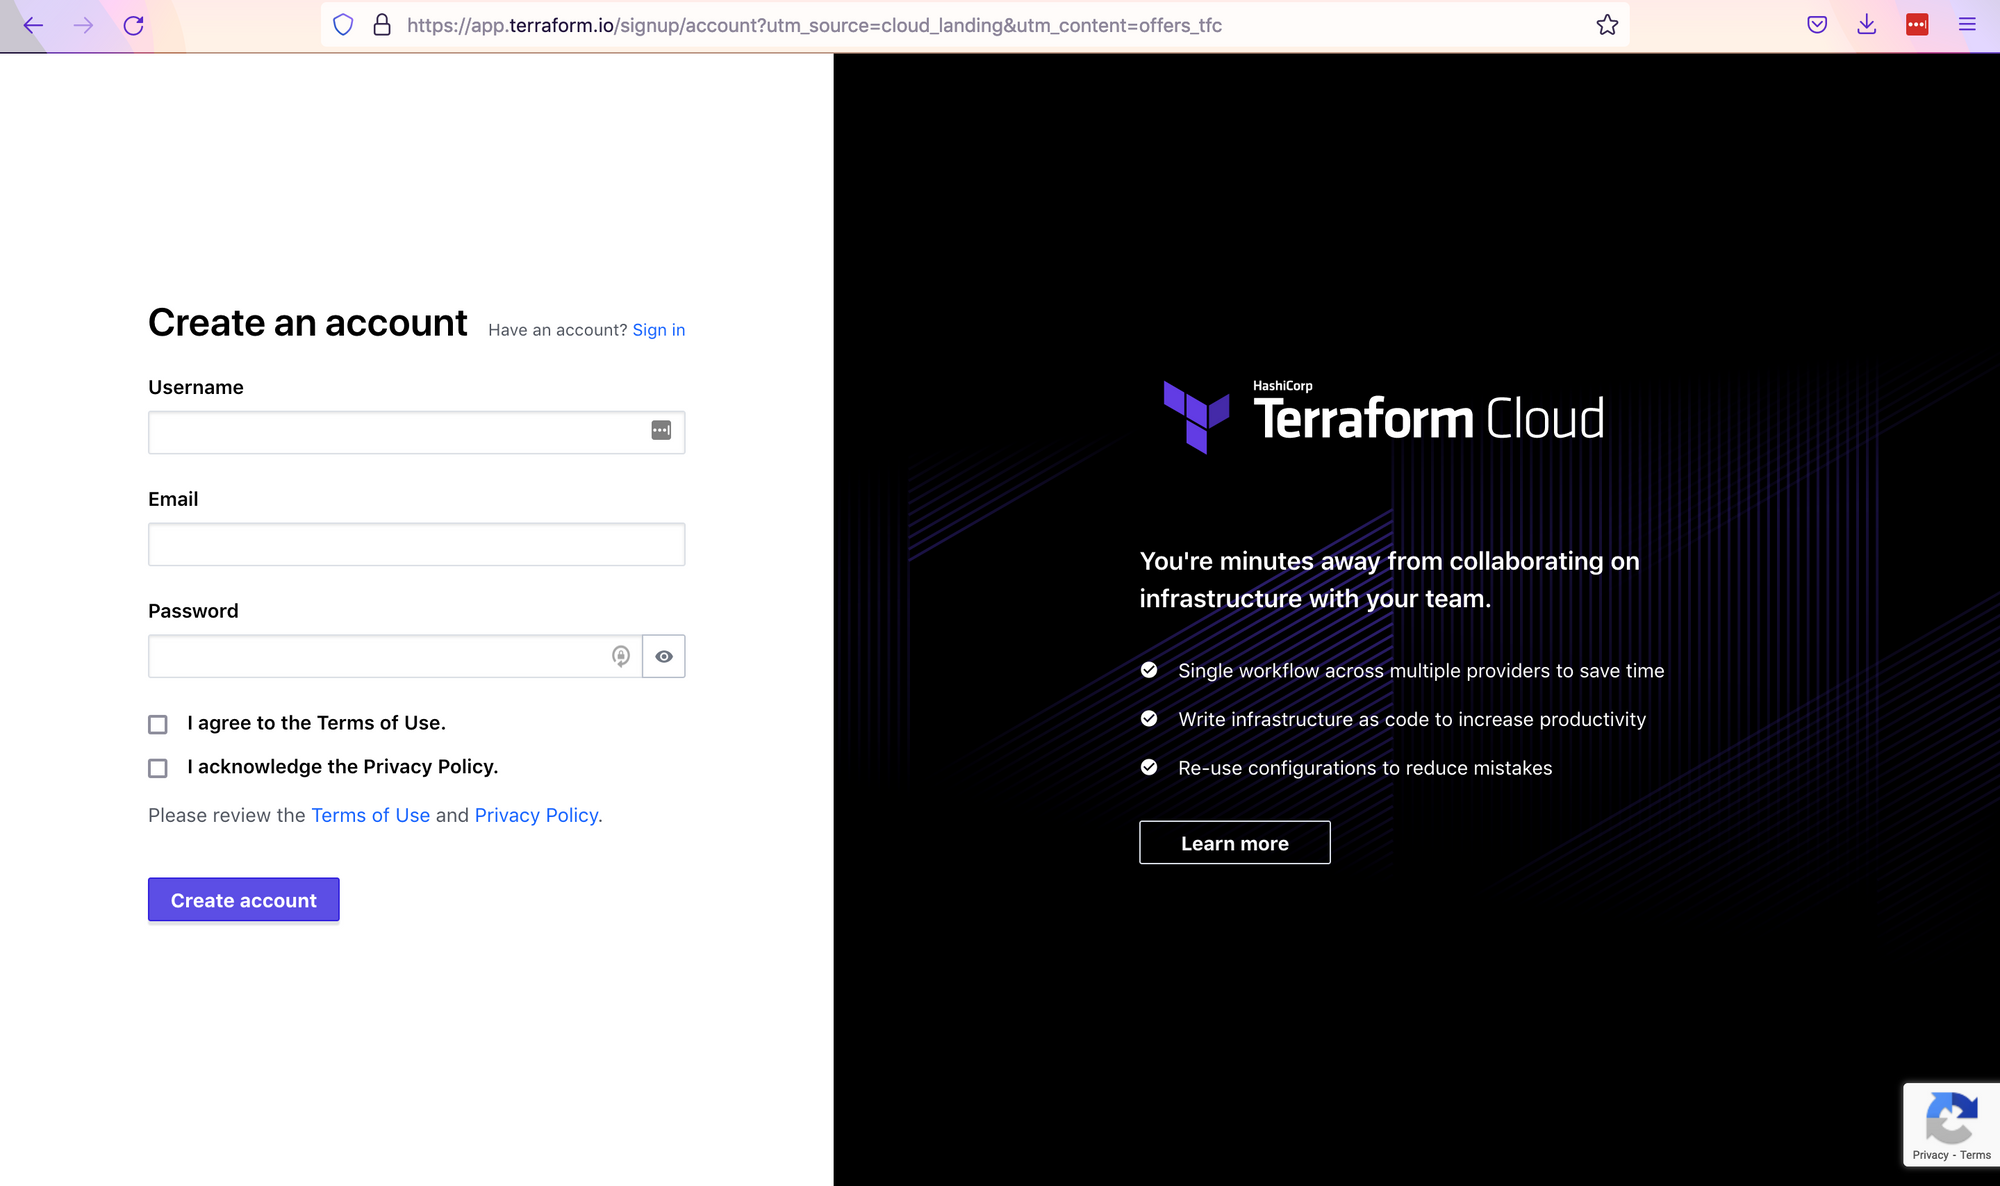
Step 1: Sign up
To create your Terraform Cloud account, follow this link. At the moment of writing, Terraform Cloud offers a free plan with all the open-source features, as well as state management, remote operations, and private module registries.
After successfully creating and confirming your account, you can log in. You will be redirected to the "Workspaces" view.
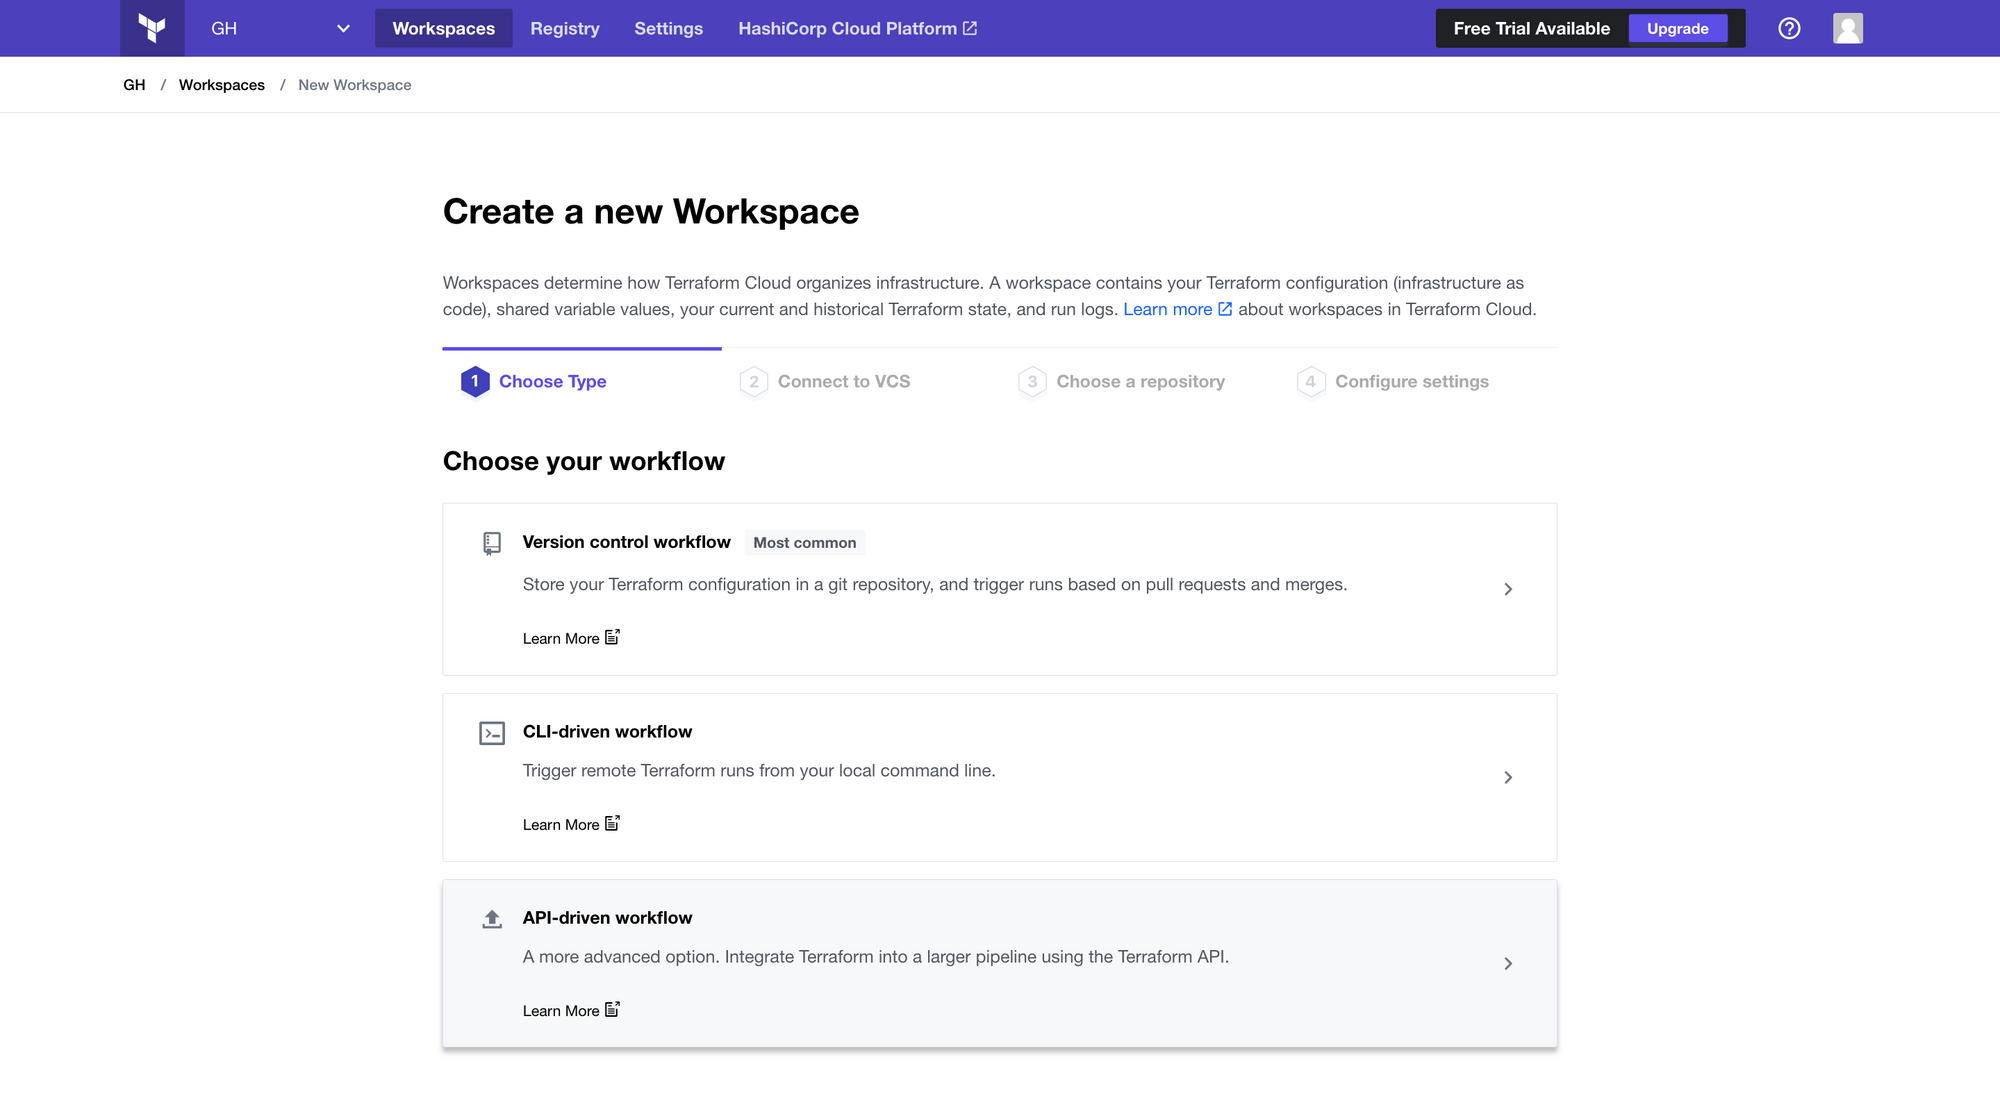
Step 2: Create workspaces
In the next step, we will create our three workspaces, one per environment. To create a workspace in Terraform Cloud, click the "New workspace" button.
When the workspace creation form shows up, we can choose the "API-driven workflow", since we will be triggering our deployments using GitHub Actions.
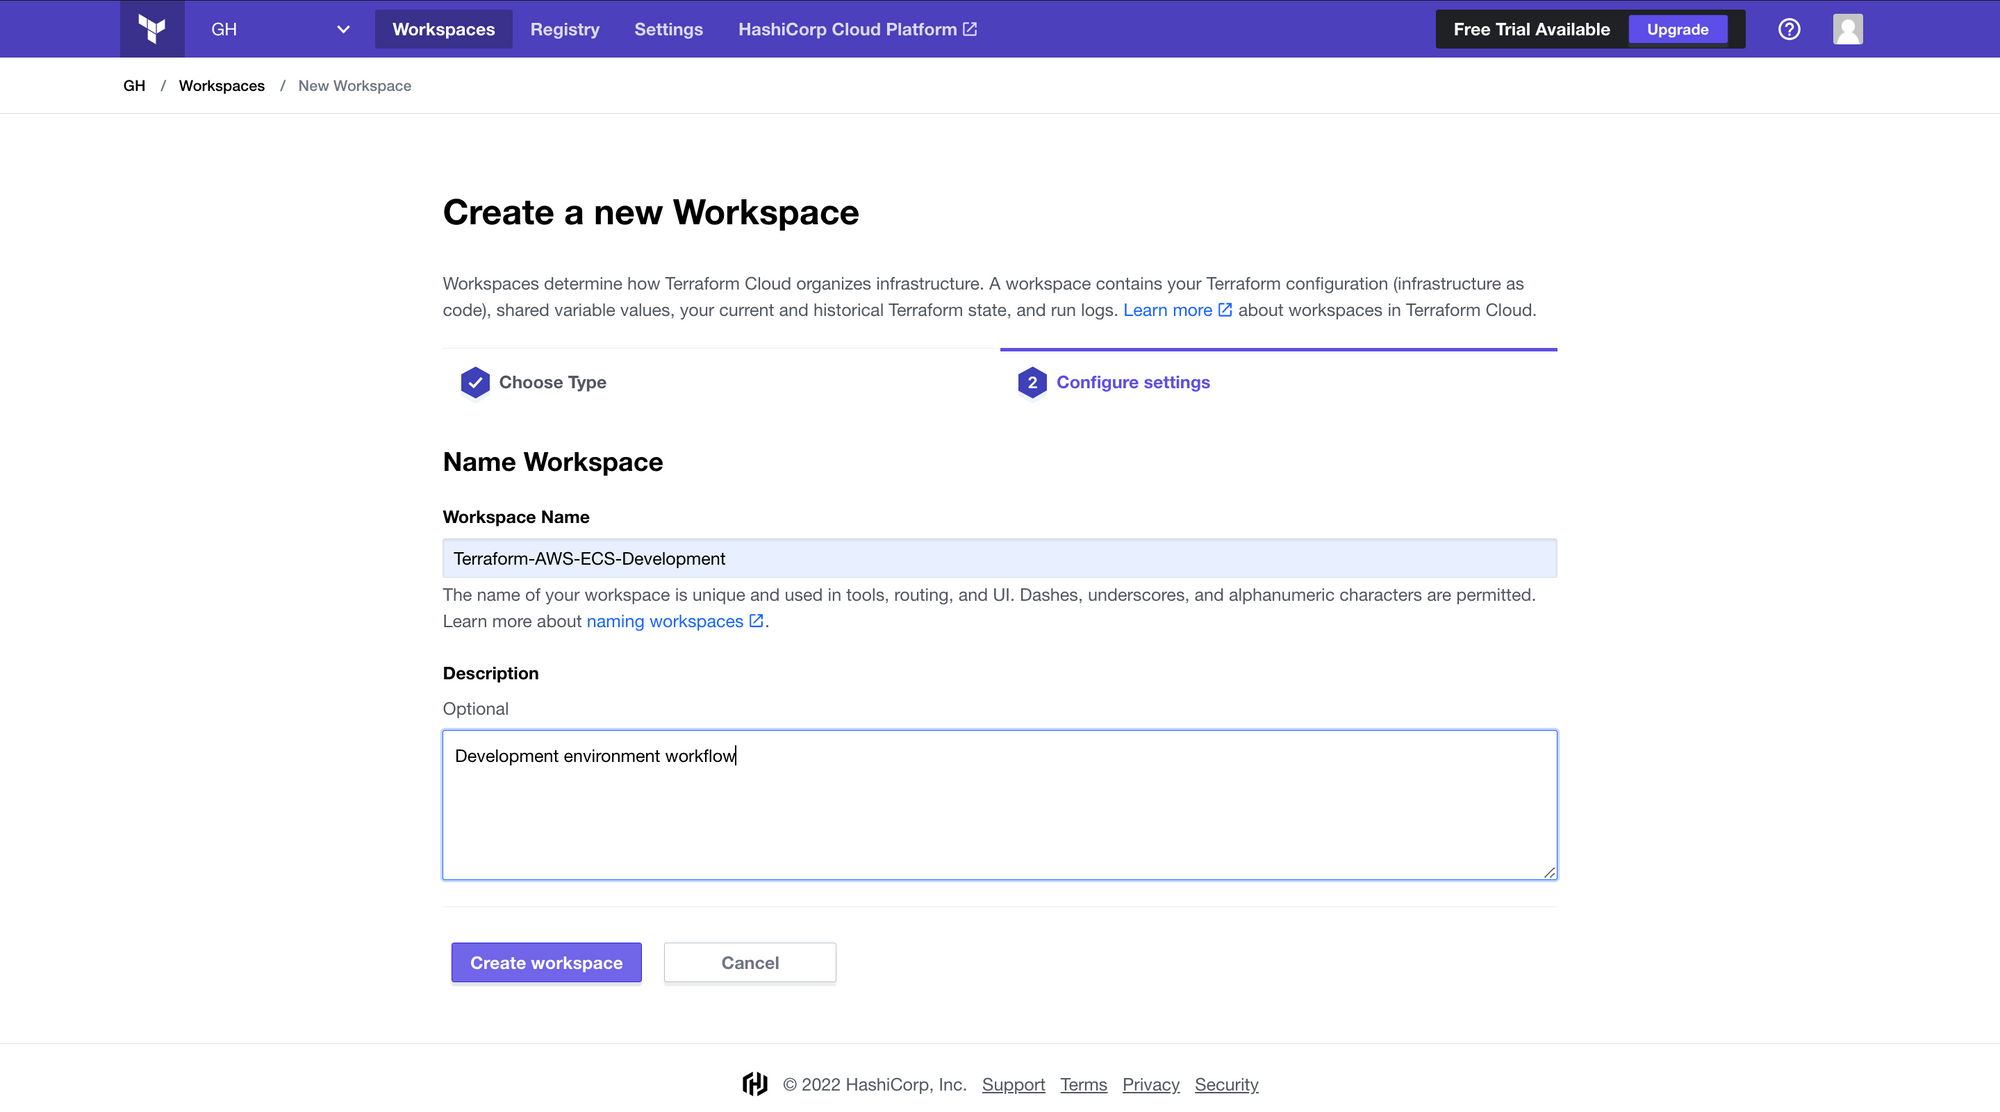
In the next step, we must set a name and a description for our workflow.
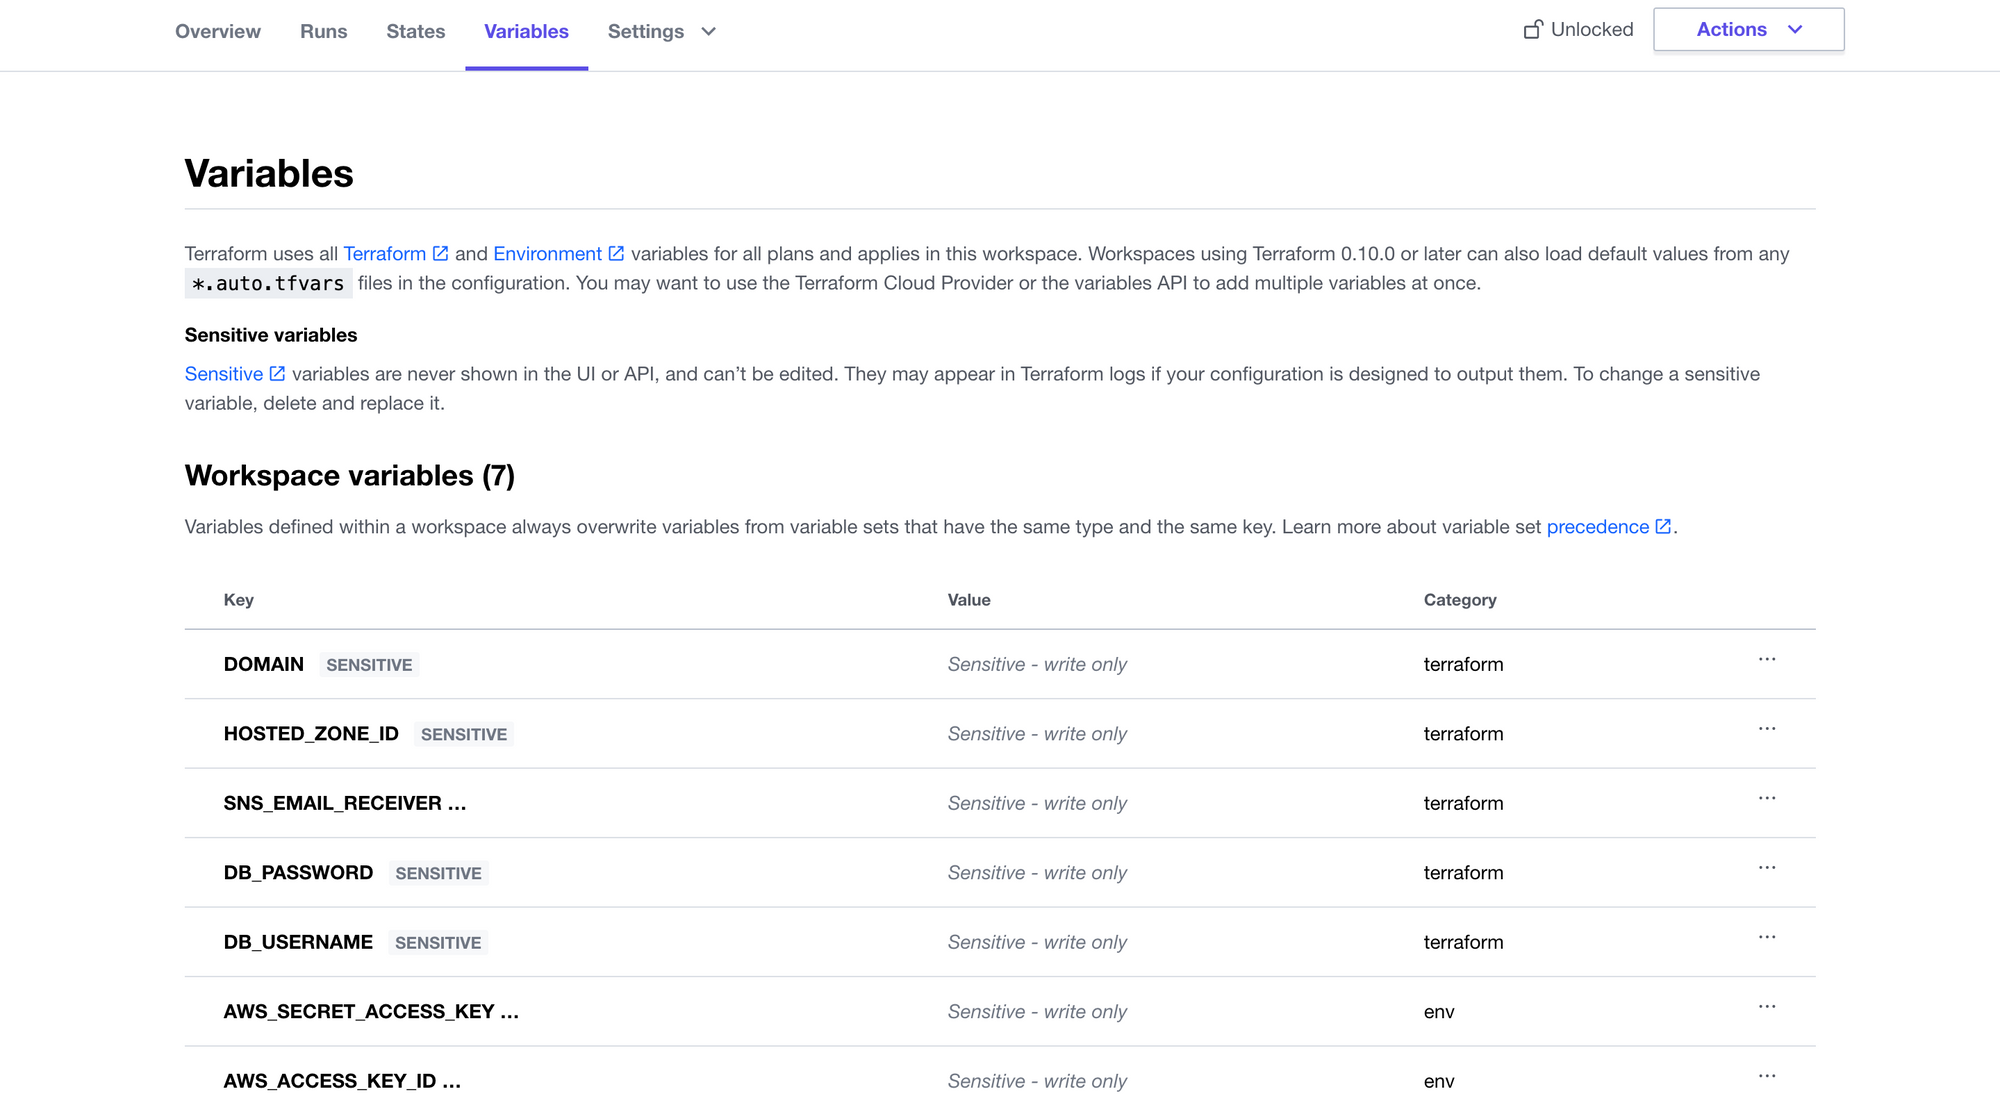
Step 3: Set variables
After creating the workspace, we must define the environment variables (the AWS access key and secret key), and the Terraform variables for our development environment (what we have defined in our variables.tf file within the development directory). We can click on the created workspace and navigate to the "Variables" tab to add variables.
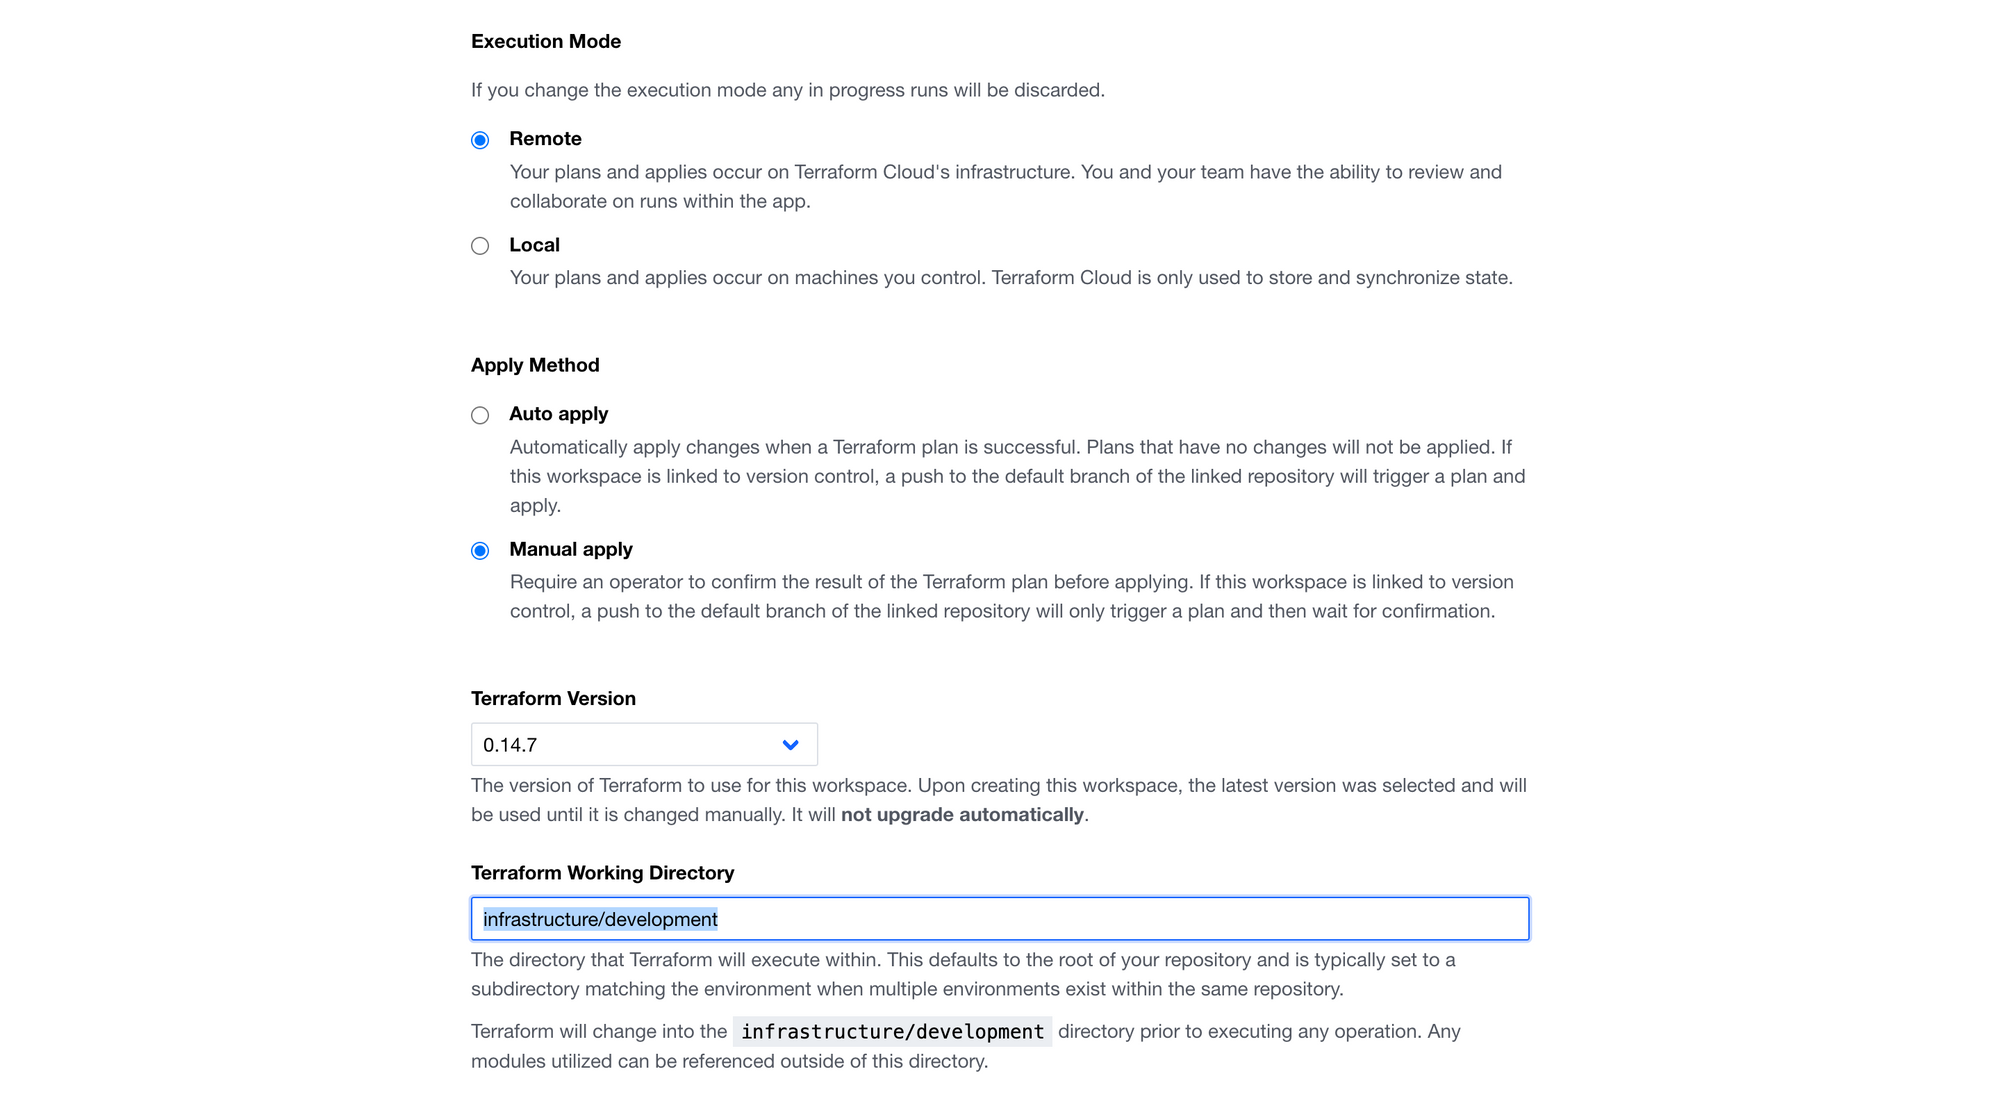
Step 4: Define the working directory
As a final step, we need to set the working directory of our workspace, so that Terraform can go within this specified directory and execute all commands.
Step 5: Create two other workspaces for staging and production
Finally, we can repeat all the steps above for creating two new workspaces for the remaining environments.
Preparing the GitHub workflow
Our GitHub Actions workflow will contain the following steps:
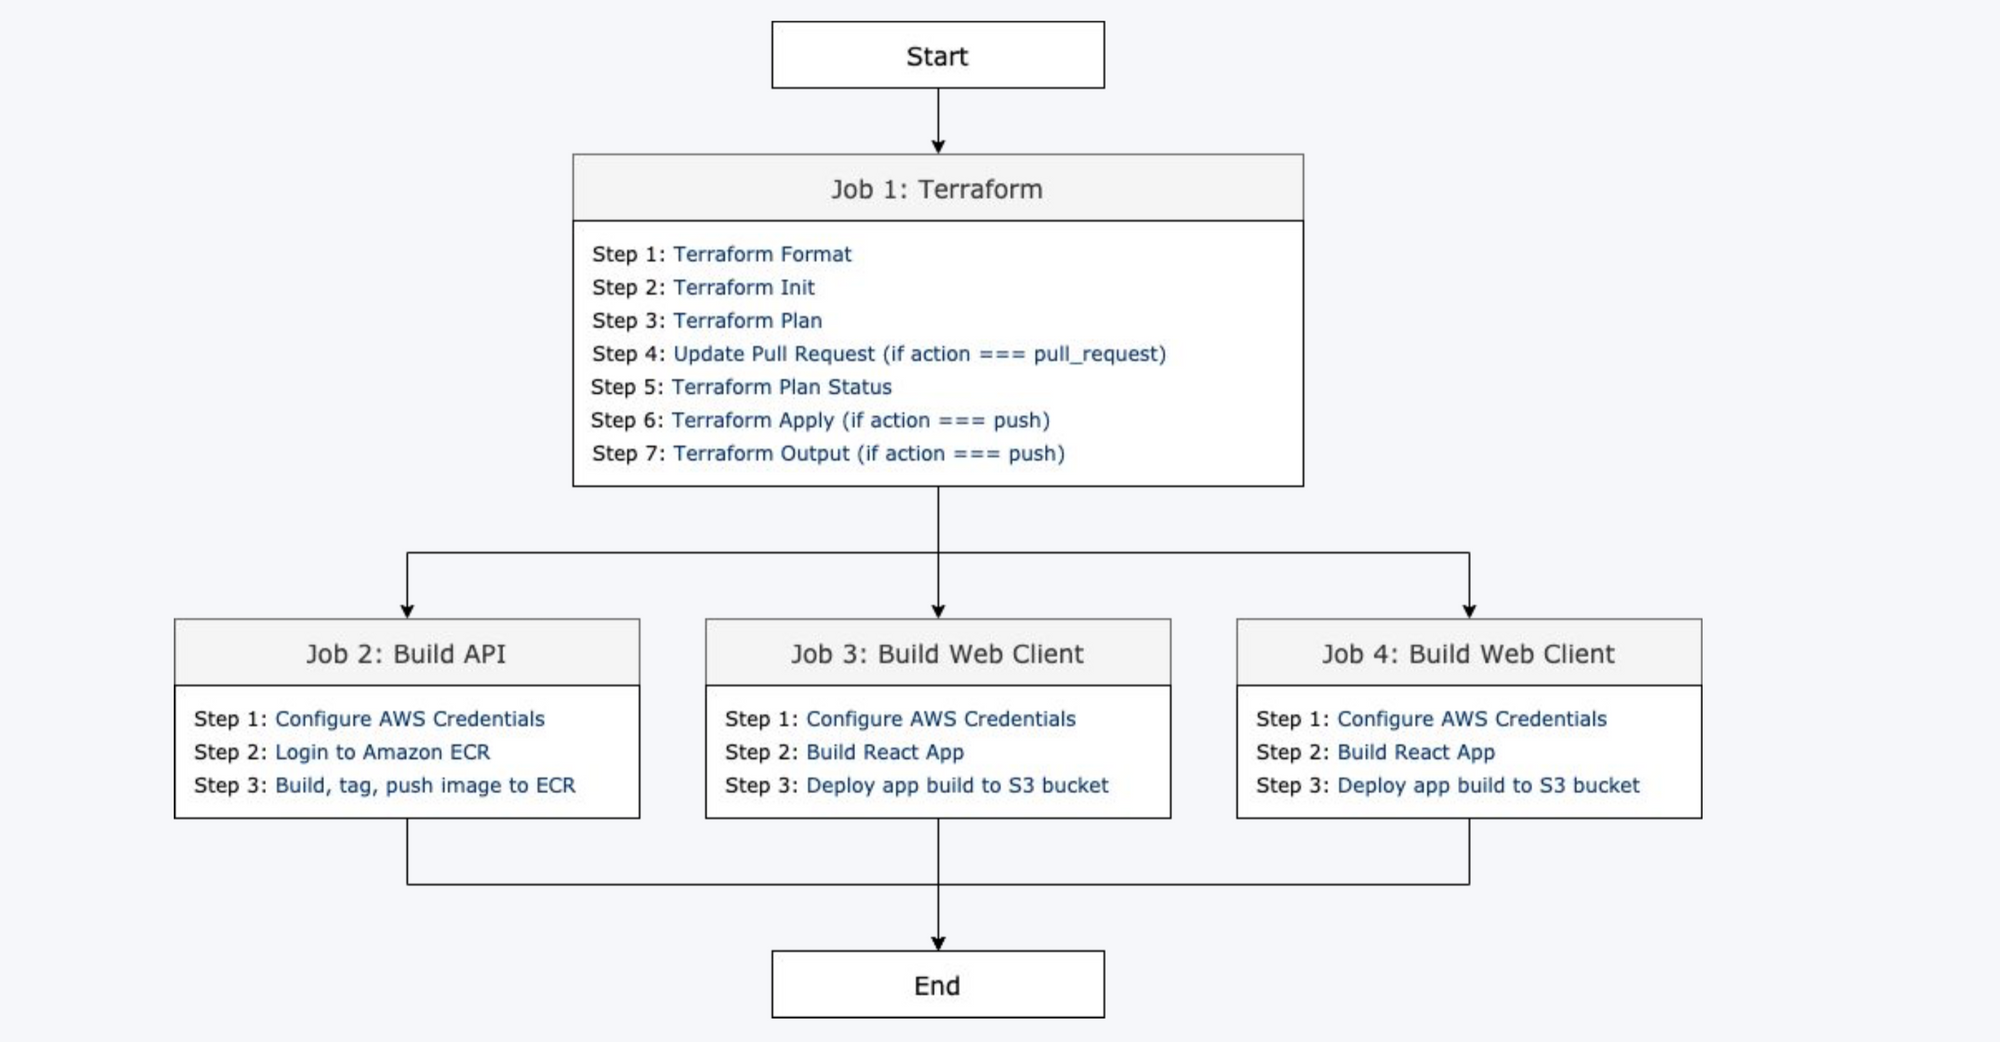
The whole process will be divided into two main steps:
- Deploying the infrastructure: This step will be composed of multiple smaller jobs (lint, init, plan, update pull-request, apply, output).
- Deploying the applications: There are three jobs executed in parallel in this phase (building and deploying the API, building and deploying the first web client, building and deploying the second web client). Each of these jobs is composed of other smaller jobs.
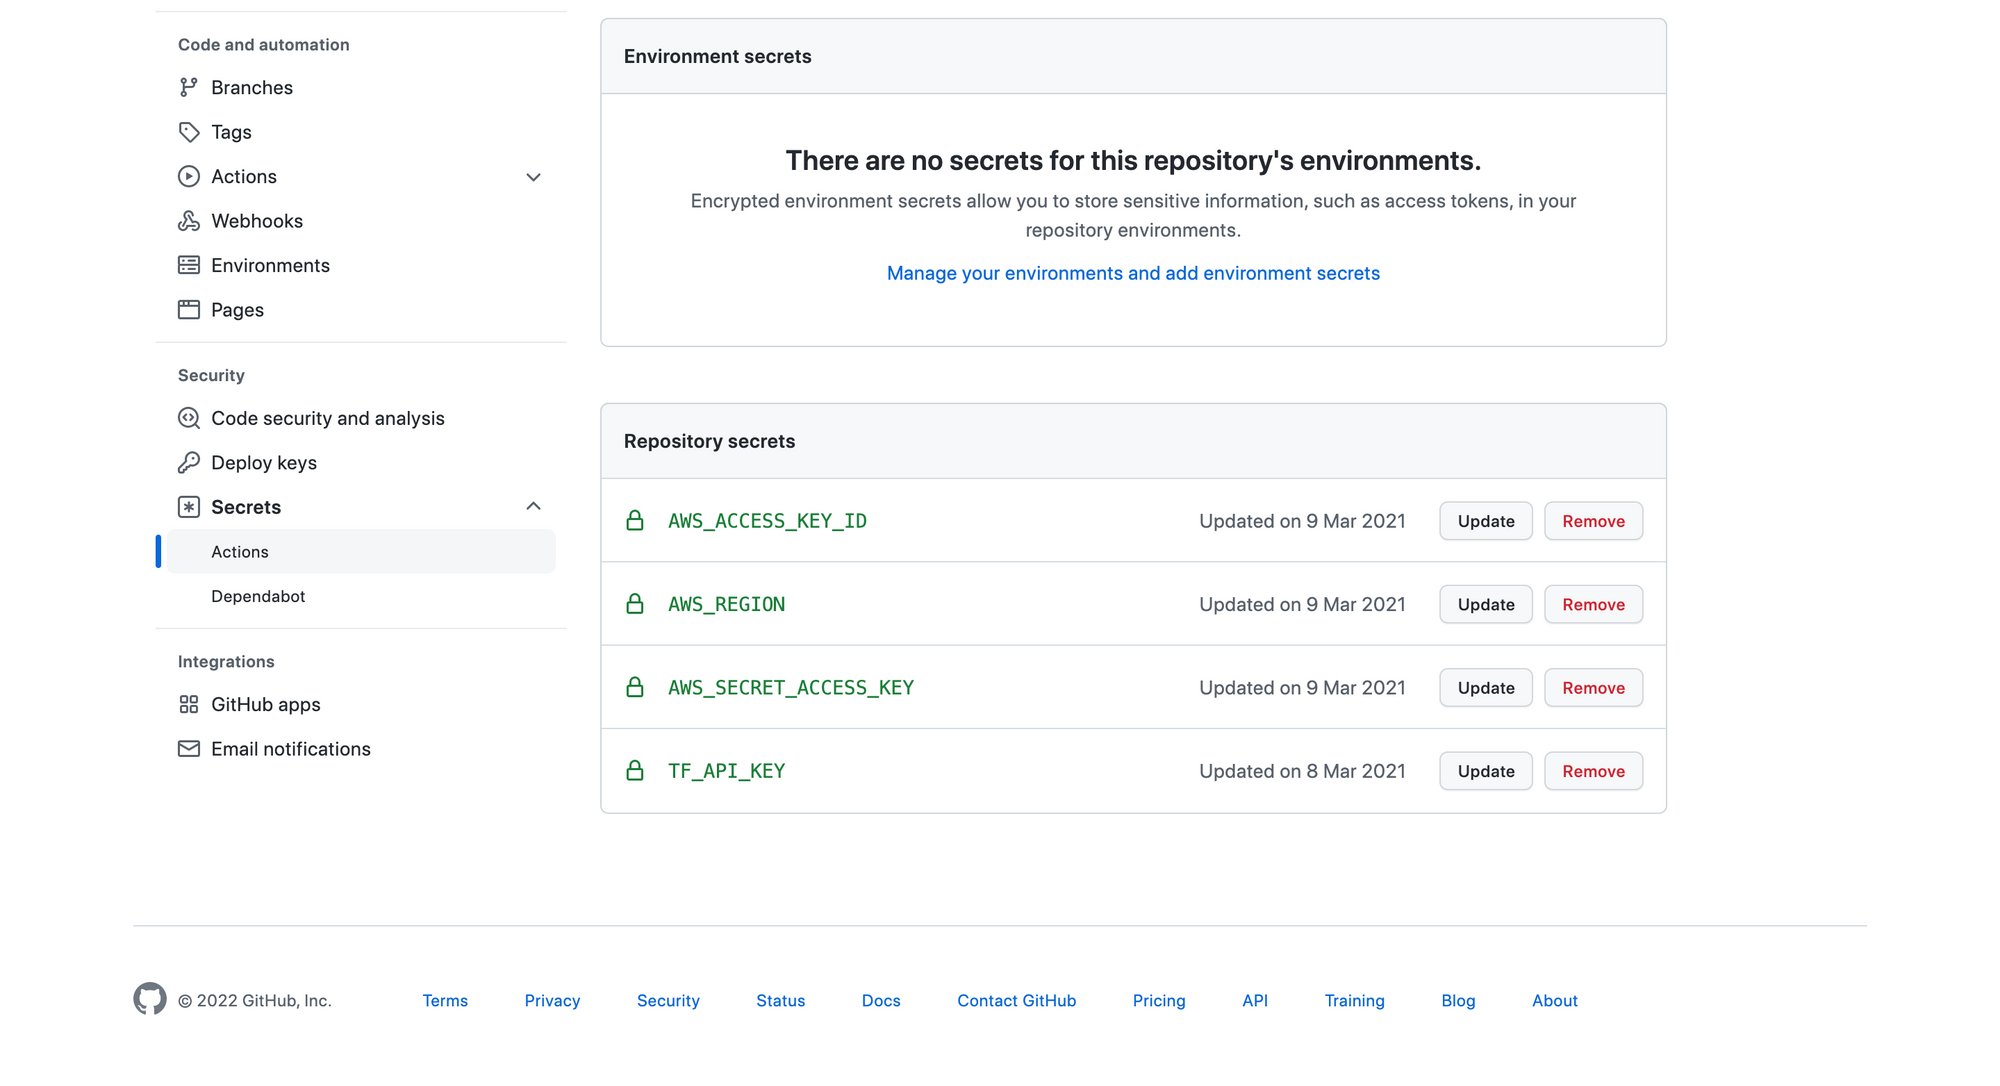
Step 1: Adding the necessary keys to our GitHub repo
Before going into each job in detail, we need to add our configuration secrets to our GitHub repo. We need the following variables added as secrets:
- AWS Access Key Id, AWS Secret Access Key, AWS Region: These are all needed to authenticate the AWS plugins we will use during our pipeline execution (for pushing our images or deploying our frontend applications). We can generate the keys in the AWS IAM users section (keep in mind to give the CI/CD user only the necessary permissions).
- Terraform API key: For deploying the infrastructure using GitHub Actions we must first set up Terraform on our runner. For this, we need to generate an API token on our Terraform Cloud account, under the "Tokens" tab in user settings.
Here is the "Secrets" view after adding all the necessary keys:
Step 2: Deploying the infrastructure
For deploying our infrastructure, we will execute the steps listed below (some of the steps are executed only when doing pull requests, others when pushing to specific branches). We will be looking at the development workflow from this point onwards. For more details regarding this step, here is the official documentation.
- Define the working directory: For the development workflow the working directory will be
infrastructure/development. On the provider.tf file under this directory, we have configured Terraform Cloud as the backend and we have also defined the workspace name for this environment. - Setup Terraform: Retrieves the Terraform CLI used in the GitHub action workflow, reads the Terraform API token from the secret variables, and authenticates the CLI to Terraform Cloud.
- Terraform Format: Checks whether the configuration has been properly formatted. If the configuration isn't properly formatted this step will produce an error.
- Terraform Init: Initializes the configuration used in the GitHub action workflow.
- Terraform Plan: Generates a Terraform plan. Since provider.tf configures the Terraform Cloud integration, this step triggers a remote plan run in the Terraform Cloud. This step only runs on pull requests and continues running even if an error is thrown. The error will be caught and handled in the following step.
- Update Pull Request: Adds a comment to the pull request with the results of the format, init and plan steps. In addition, it displays the "plan" output (
steps.plan.outputs.stdout). This allows your team to review the results of the plan directly in the PR instead of opening Terraform Cloud. This step only runs on pull requests. - Terraform Plan Status: Returns whether a plan was successfully generated or not. This is where the "plan" errors are caught. If an error happened, the process exits with status 1.
- Terraform Apply: Applies the configuration. This step will only run when a commit is pushed to one of our main branches (development, staging, production).
- Terraform Output: As a final step, we need to output a few variables which will be useful for the next steps in our pipeline.
Here is what our development workflow script contains till this point:
name: 'Deploy to Development'

on:
  push:
    branches:
      - dev
  pull_request:
    branches:
      - dev

jobs:
  terraform:
    name: 'Terraform'
    runs-on: ubuntu-latest
    defaults:
      run:
        shell: bash
        working-directory: infrastructure/development
    steps:
      - uses: actions/checkout@v2
      - name: Setup Terraform
        uses: hashicorp/setup-terraform@v1
        with:
          cli_config_credentials_token: ${{ secrets.TF_API_KEY }}
          terraform_wrapper: false
      - name: Terraform Format
        id: fmt
        run: terraform fmt -check
      - name: Terraform Init
        id: init
        run: terraform init
      - name: Terraform Plan
        id: plan
        if: github.event_name == 'pull_request'
        run: terraform plan -no-color
        continue-on-error: true
      - name: Update Pull Request
        uses: actions/github-script@0.9.0
        if: github.event_name == 'pull_request'
        env:
          PLAN: "terraform\n${{ steps.plan.outputs.stdout }}"
        with:
          github-token: ${{ secrets.GITHUB_TOKEN }}
          script: |
            const output = `#### Terraform Format and Style 🖌\`${{ steps.fmt.outcome }}\`
            #### Terraform Initialization ⚙️\`${{ steps.init.outcome }}\`
            #### Terraform Plan 📖\`${{ steps.plan.outcome }}\`
            <details><summary>Show Plan</summary>
            \`\`\`${process.env.PLAN}\`\`\`
            </details>
            *Pusher: @${{ github.actor }}, Action: \`${{ github.event_name }}\`*`;
            github.issues.createComment({
              issue_number: context.issue.number,
              owner: context.repo.owner,
              repo: context.repo.repo,
              body: output
            })
      - name: Terraform Plan Status
        if: steps.plan.outcome == 'failure'
        run: exit 1
      - name: Terraform Apply
        if: github.event_name == 'push'
        run: terraform apply -auto-approve
      - name: Terraform Output
        id: output
        if: github.event_name == 'push'
        run: |
          web_client_bucket_dev=$(terraform output WEB_CLIENT_BUCKET_DEV)
          web_admin_bucket_dev=$(terraform output WEB_ADMIN_BUCKET_DEV)
          web_client_domain_dev=$(terraform output WEB_CLIENT_DOMAIN_DEV)
          web_admin_domain_dev=$(terraform output WEB_ADMIN_DOMAIN_DEV)
          ecr_repository_name=$(terraform output ECR_REPOSITORY_NAME_DEV)
          alb_domain_name=$(terraform output ALB_DOMAIN_NAME_DEV)
          echo "::set-output name=WEB_CLIENT_BUCKET_DEV::${web_client_bucket_dev}"
          echo "::set-output name=WEB_ADMIN_BUCKET_DEV::${web_admin_bucket_dev}"
          echo "::set-output name=WEB_CLIENT_DOMAIN_DEV::${web_client_domain_dev}"
          echo "::set-output name=WEB_ADMIN_DOMAIN_DEV::${web_admin_domain_dev}"
          echo "::set-output name=ECR_REPOSITORY_NAME_DEV::${ecr_repository_name}"
          echo "::set-output name=ALB_DOMAIN_NAME_DEV::${alb_domain_name}"
    outputs:
      WEB_CLIENT_DOMAIN_DEV: ${{ steps.output.outputs.WEB_CLIENT_DOMAIN_DEV }}
      WEB_ADMIN_DOMAIN_DEV: ${{ steps.output.outputs.WEB_ADMIN_DOMAIN_DEV }}
      WEB_CLIENT_BUCKET_DEV: ${{ steps.output.outputs.WEB_CLIENT_BUCKET_DEV }}
      WEB_ADMIN_BUCKET_DEV: ${{ steps.output.outputs.WEB_ADMIN_BUCKET_DEV }}
      ECR_REPOSITORY_NAME_DEV: ${{ steps.output.outputs.ECR_REPOSITORY_NAME_DEV }}
ALB_DOMAIN_NAME_DEV: ${{ steps.output.outputs.ALB_DOMAIN_NAME_DEV }}Step 3: Building and deploying the API
Our API is deployed in ECS containers. These are the steps we need to follow to build and push our image to the registry (after that, the new image is read automatically and the containers are recreated):
- Configure AWS Credentials: Using the AWS Access Key and Secret Key stored in our secrets, we authenticate the AWS plugins that are used in this step.
- Login to Amazon ECR: We use a plugin to log in to our container registry where we will push the generated image.
- Build, tag, and push the image to Amazon ECR: This step builds the docker image for the API, tags it with the "latest" tag, and pushes it to ECR.
Here is how the whole step looks:
build_api:
    name: 'Build API'
    runs-on: ubuntu-latest
    needs: terraform
    steps:
      - uses: actions/checkout@v2
      - name: Configure AWS Credentials
        uses: aws-actions/configure-aws-credentials@v1
        with:
          aws-access-key-id: ${{ secrets.AWS_ACCESS_KEY_ID }}
          aws-secret-access-key: ${{ secrets.AWS_SECRET_ACCESS_KEY }}
          aws-region: ${{ secrets.AWS_REGION }}
      - name: Login to Amazon ECR
        id: login-ecr
        uses: aws-actions/amazon-ecr-login@v1
      - name: Build, tag, and push image to Amazon ECR
        id: build-image
        env:
          ECR_REGISTRY: ${{ steps.login-ecr.outputs.registry }}
          ECR_REPOSITORY: ${{ needs.terraform.outputs.ECR_REPOSITORY_NAME_DEV }}
          IMAGE_TAG: latest
        run: |
          docker build -t "${{ env.ECR_REGISTRY }}/${{ env.ECR_REPOSITORY }}:${{ env.IMAGE_TAG }}" ./api
          docker push "${{ env.ECR_REGISTRY }}/${{ env.ECR_REPOSITORY }}:${{ env.IMAGE_TAG }}"
echo "::set-output name=image::${{ env.ECR_REGISTRY }}/${{ env.ECR_REPOSITORY }}:${{ env.IMAGE_TAG }}"Step 4: Building and deploying the Web clients
Our two web clients are built in React.js and hosted in S3 buckets. To build and deploy them, we execute the following steps:
- Configure AWS Credentials: Same as above.
- Build React App: Here we install all project dependencies, configure the local environment (e.g. define the API URL which the web client will consume), and build the application.
- Deploy app build to S3 bucket: In the last step, we push the generated build to the corresponding S3 bucket.
Here is how the code looks (for both web clients):
build_web_client:
    name: 'Build Web Client'
    runs-on: ubuntu-latest
    needs: terraform
    defaults:
      run:
        shell: bash
        working-directory: web_client
    steps:
      - uses: actions/checkout@v2
      - name: Configure AWS Credentials
        uses: aws-actions/configure-aws-credentials@v1
        with:
          aws-access-key-id: ${{ secrets.AWS_ACCESS_KEY_ID }}
          aws-secret-access-key: ${{ secrets.AWS_SECRET_ACCESS_KEY }}
          aws-region: ${{ secrets.AWS_REGION }}
      - name: Build React App
        run: |
          npm install
          export REACT_APP_SERVER_URL=http://${{ needs.terraform.outputs.ALB_DOMAIN_NAME_DEV }}
          npm run build
      - name: Deploy app build to S3 bucket
        run: aws s3 sync ./build/ s3://${{ needs.terraform.outputs.WEB_CLIENT_BUCKET_DEV }} --delete
  build_web_admin:
    name: 'Build Web Admin'
    runs-on: ubuntu-latest
    needs: terraform
    defaults:
      run:
        shell: bash
        working-directory: web_admin
    steps:
      - uses: actions/checkout@v2
      - name: Configure AWS Credentials
        uses: aws-actions/configure-aws-credentials@v1
        with:
          aws-access-key-id: ${{ secrets.AWS_ACCESS_KEY_ID }}
          aws-secret-access-key: ${{ secrets.AWS_SECRET_ACCESS_KEY }}
          aws-region: ${{ secrets.AWS_REGION }}
      - name: Build React App
        run: |
          npm install
          export REACT_APP_SERVER_URL=http://${{ needs.terraform.outputs.ALB_DOMAIN_NAME_DEV }}
          npm run build
      - name: Deploy app build to S3 bucket
run: aws s3 sync ./build/ s3://${{ needs.terraform.outputs.WEB_ADMIN_BUCKET_DEV }} --deleteTesting the setup
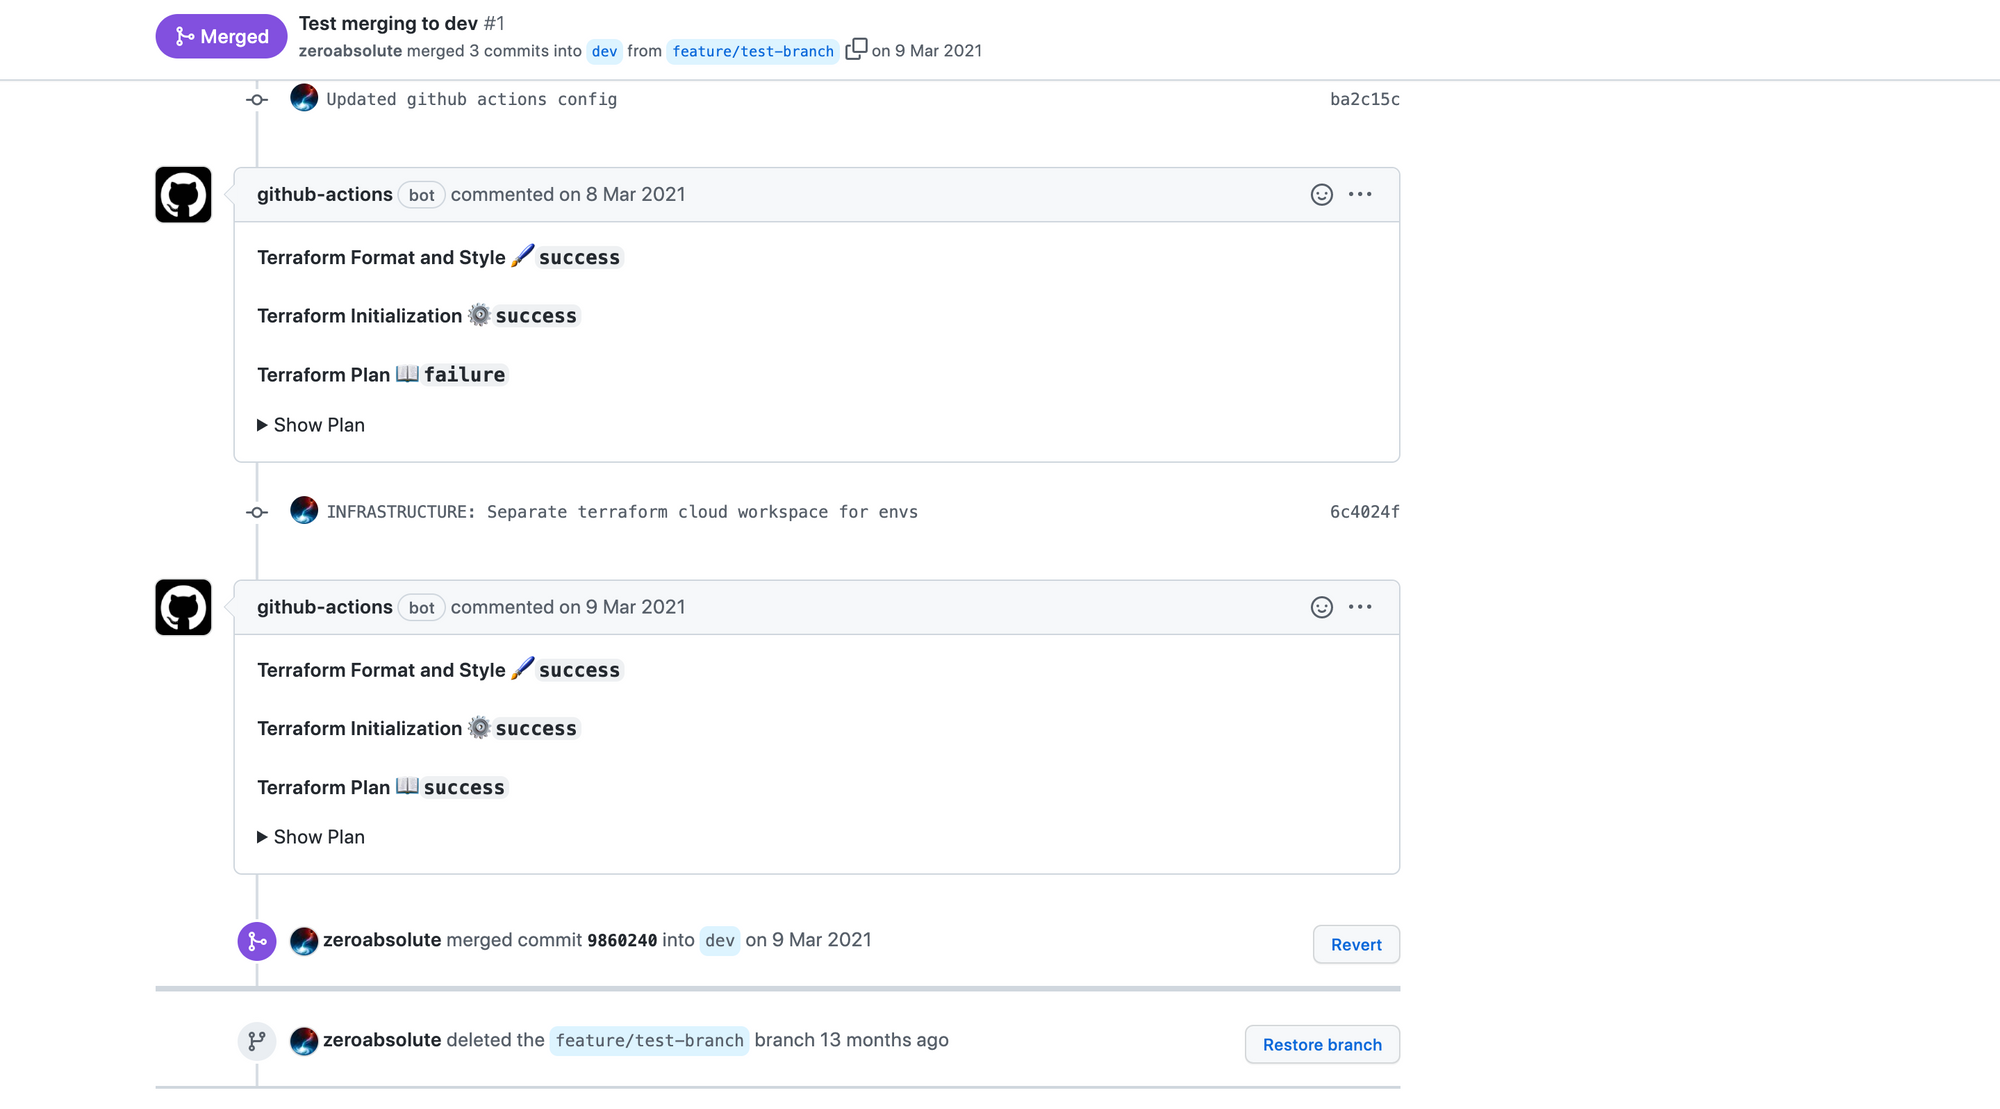
For testing the whole setup, we can do the following:
- Implement a quick dummy feature in a feature branch (e.g.
feature/dummy). - Do a pull request in
dev. - Merge
devtostagingand eventuallymaster.
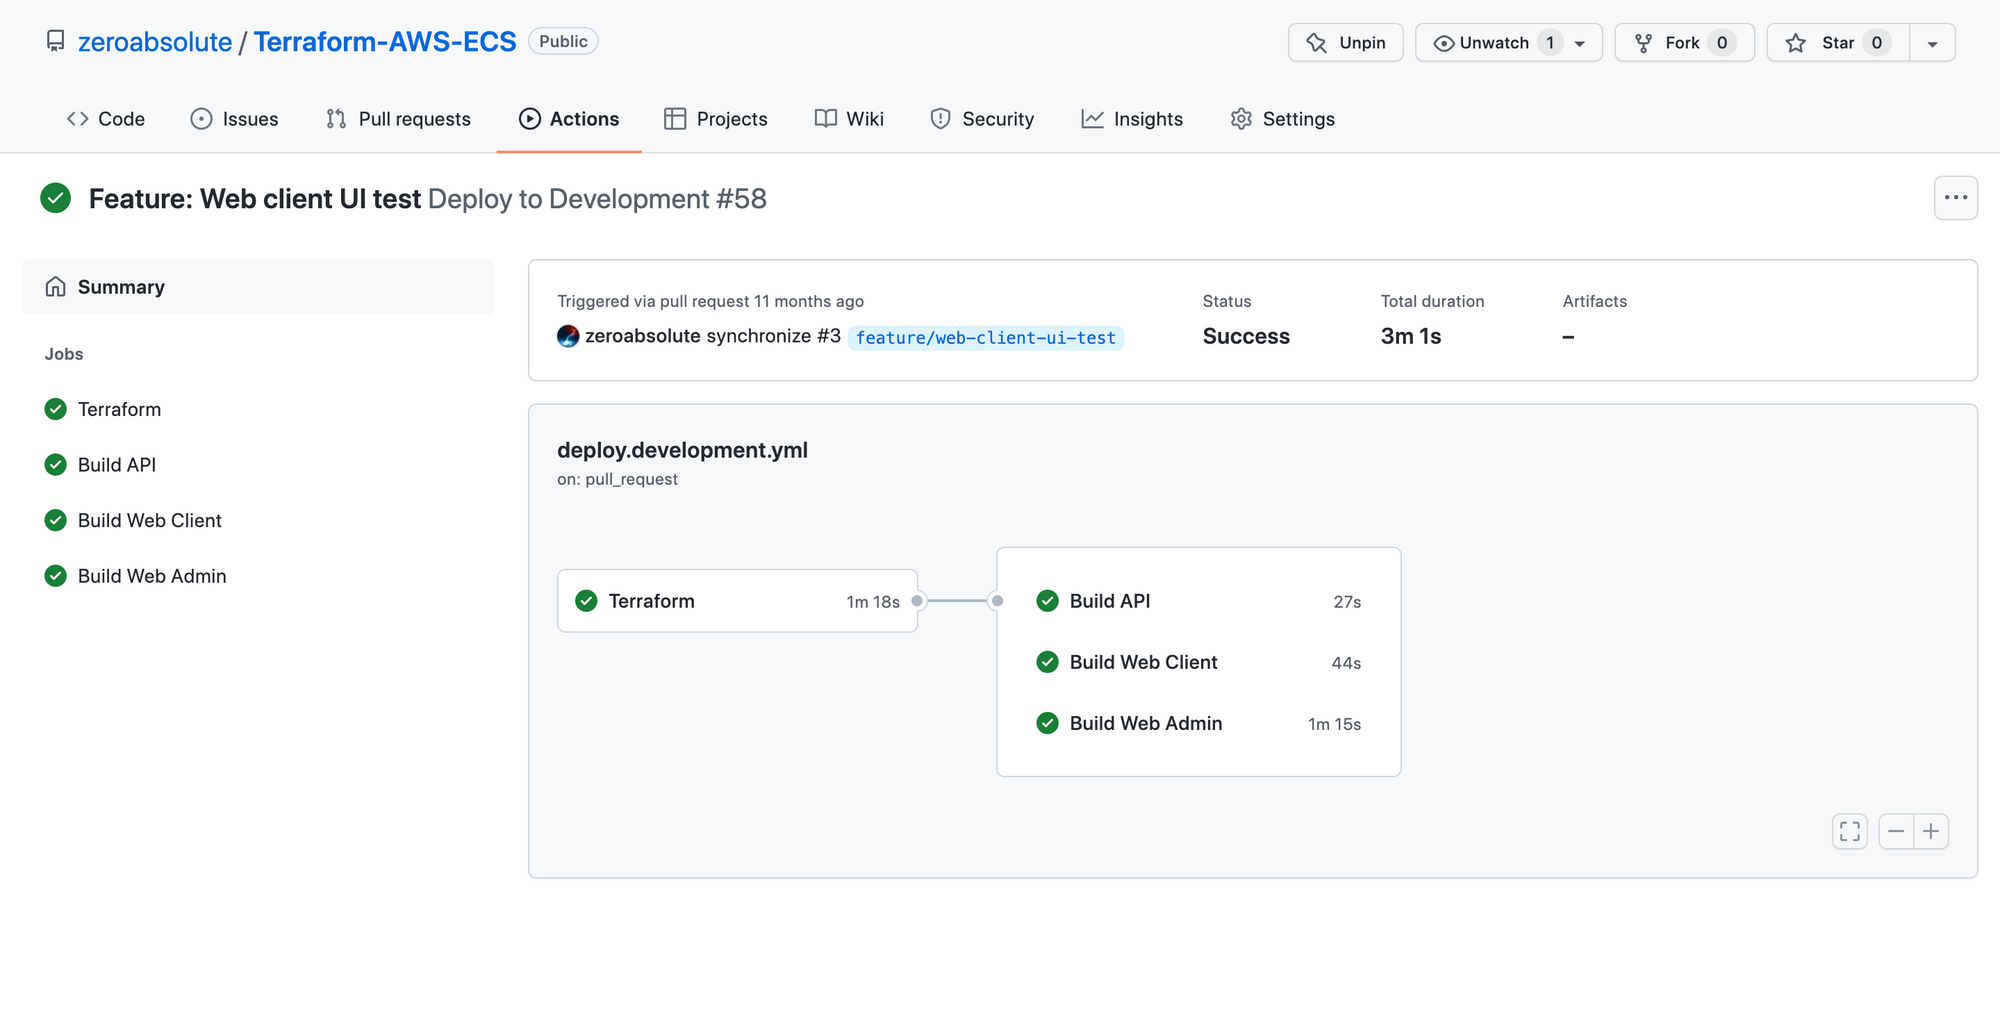
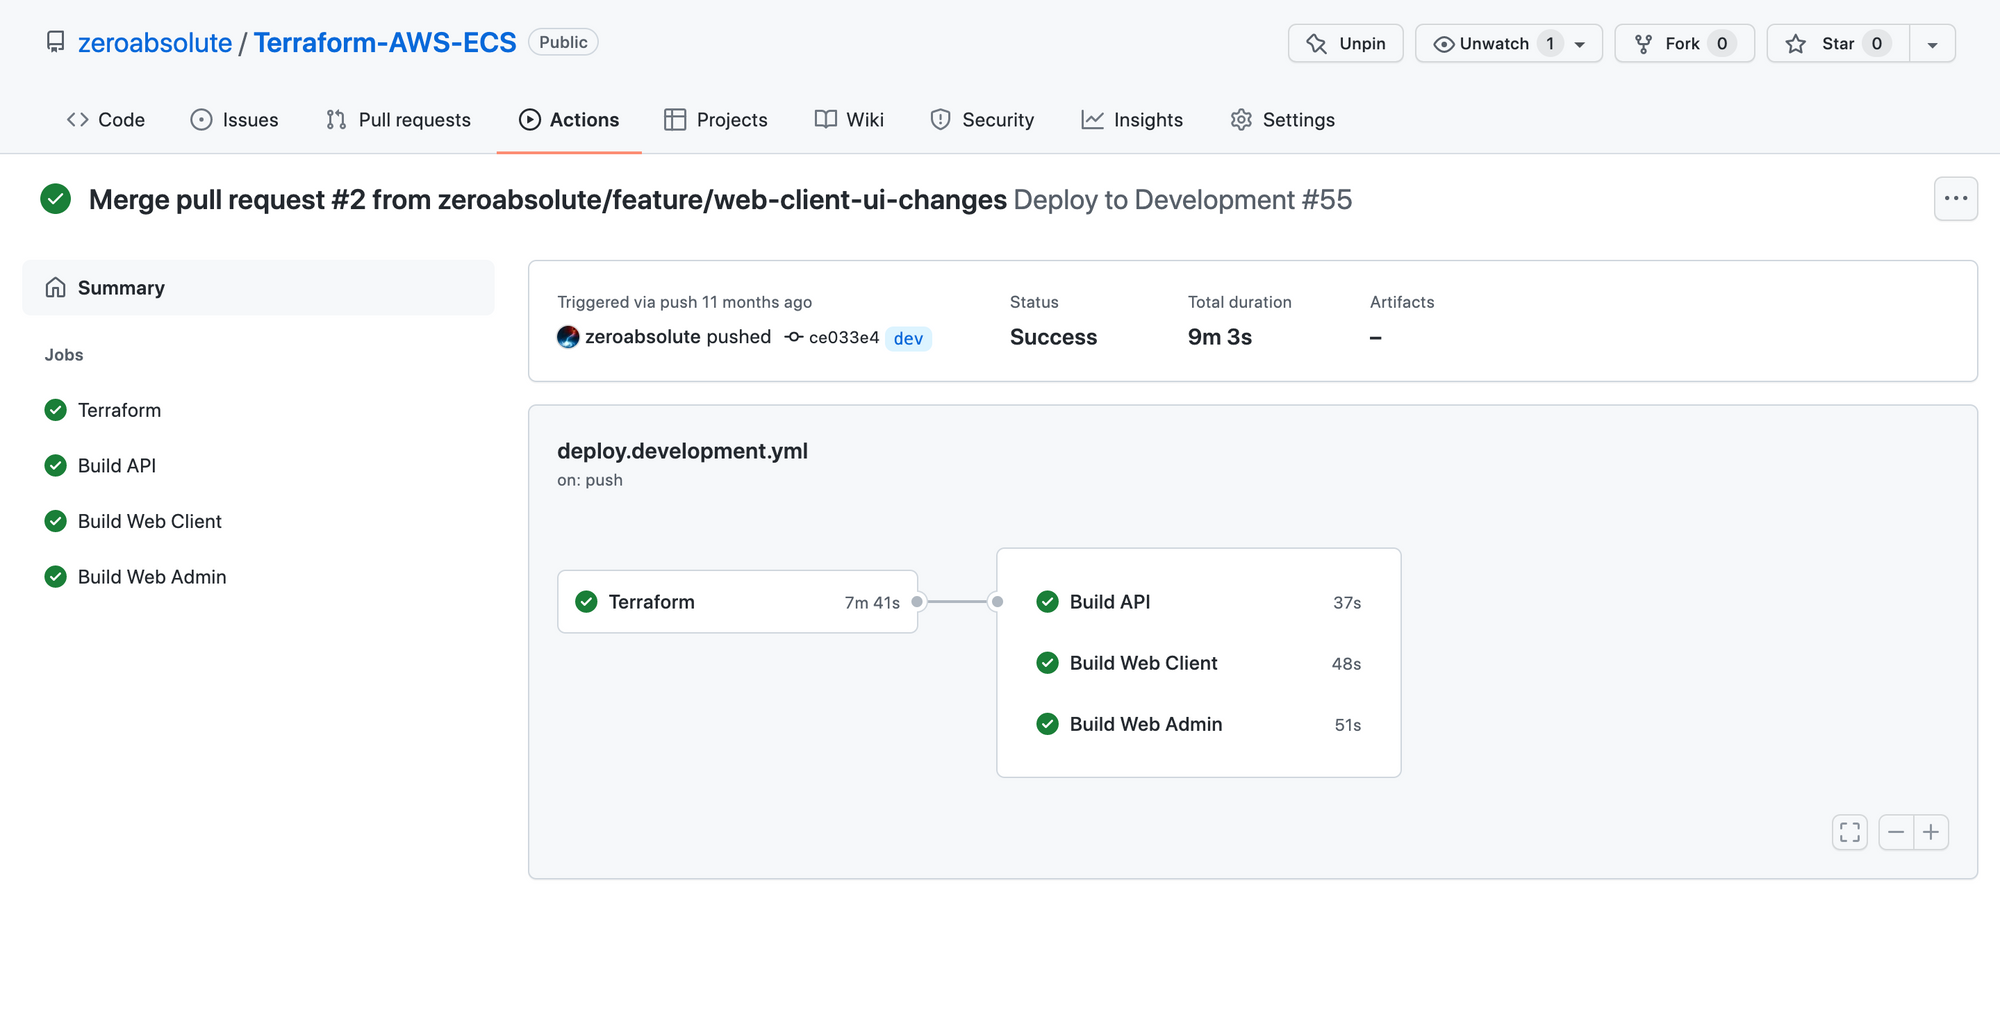
Here are some screenshots of different test scenarios:
References
- Full source code implementation: https://github.com/zeroabsolute/Terraform-AWS-ECS
- Automate Terraform: https://learn.hashicorp.com/collections/terraform/automation
- AWS for GitHub Actions: https://github.com/aws-actions
- GitHub Actions documentation: https://docs.github.com/en/actions