Long-Term Memory for Chatbots: Langchain's Agent Solution
Introduction
In the rapidly evolving landscape of artificial intelligence and virtual assistants, the quest for ever-more sophisticated capabilities has reached new heights. Among the myriad innovations driving this evolution, Langchain emerges as a beacon of transformative potential, offering a groundbreaking solution poised to redefine the very fabric of human-bot interactions: the integration of long-term memory into chatbot agents.
In our interconnected world, where seamless engagement and personalized experiences reign supreme, Langchain's mission stands out as both simple and revolutionary. By imbuing chatbots with the power of permanent memory, Langchain charts a course toward a future where virtual assistants not only understand user preferences but also retain and recall them across multiple interactions, creating a profoundly immersive and tailored user experience.
In this exploration of Langchain's pioneering approach, we delve deep into the core principles underpinning its agent solution. From the intricacies of memory retention to the mechanisms enabling seamless recall, we uncover the intricate tapestry of technologies driving the evolution of chatbot intelligence. Join us as we unravel the fabric of possibility woven by Langchain, and discover how the fusion of artificial intelligence and long-term memory promises to reshape the landscape of human-bot interaction as we know it.
What is Langchain?
LangChain is an advanced framework designed to simplify the development process for applications leveraging Large Language Models (LLMs) such as GPT-3. It provides developers with the tools needed to create cutting-edge, data-driven applications that seamlessly interact with language models and integrate with various data sources. As an open-source solution, LangChain facilitates the creation of diverse applications, including question-answering tools and sentiment analysis platforms, pushing the boundaries of language model capabilities. Supported by a vibrant developer community, LangChain demonstrates its potential through impressive proof-of-concept and minimum viable product applications. For professionals seeking to harness the power of language models in their projects, LangChain stands as the premier choice, offering limitless possibilities for innovation and growth.
What is an agent?
Agents, driven by language models, dynamically determine action sequences, contrasting with the static nature of traditional chains. They provide a modern approach to decision-making, offering flexibility, adaptability, and scalability across various domains. Their main advantages are:
- Flexibility: Agents adapt to changing environments and requirements due to their dynamic decision-making process.
- Efficiency: Language models enable agents to optimize actions based on real-time data and contextual understanding.
- Scalability: Agents can handle complex decision-making scenarios with ease, offering scalability for diverse applications.
- Adaptability: Through continuous learning and reasoning, agents evolve their decision-making capabilities over time, improving performance and effectiveness.
- Interpretability: Language models provide insights into the decision-making process, enhancing transparency and interpretability for stakeholders.
Types of agents
Here is a list of available agents that we might use in our app.
- OpenAI Tools: Designed for chat models, supports chat history, multi-input tools, and parallel function calling. Requires model parameters. Best suited for recent OpenAI models (1106 onwards).
- OpenAI Functions: Intended for chat models, supports chat history and multi-input tools. Specifically tailored for models fine-tuned for function calling and exposes the same function parameters as OpenAI. No parallel function calling support.
- XML: Intended for LLMs, supports chat history. Best suited for Anthropic models or other models proficient at handling XML data structures.
- Structured Chat: Tailored for chat models, supports chat history and multi-input tools. Suitable when needing to support tools with multiple inputs.
- JSON Chat: Designed for chat models, supports chat history. Ideal when using a model proficient at handling JSON data structures.
- ReAct: Intended for LLMs, supports chat history. Recommended for use with simple models due to its simplicity.
- Self Ask With Search: Tailored for LLMs. No specific support mentioned for chat history, multi-input tools, or parallel function calling. Suitable for use with simple models when only one search tool is required.
To learn more about agent types, you can read the documentation - Agent types
Steps to build long-term memory chatbot
To create a long-term memory chatbot there are multiple options and the solution might depend on various factors. In this article we will build a chatbot that can retrieve information live from the web, has knowledge about a software company called Softup Technologies and never loses the memory. Here is how we can do it using an agent :
Specify the model
The first thing that we have to do is specify a model to use for our chatbot. In this article we will use OpenAI as our artificial intelligence provider.
Below we have selected gpt-3.5-turbo-1106 as our base model and also provided the openAIApiKey to communicate with OpenAI. What is new, compared with a classic model configuration is the callbacks property. Callbacks give us different hooks that we can listen to, so we can get information about different stages of our LLM application. Below we are using handleLLMEnd to retrieve the number of tokens that we will be using in our prompt. In this case we are only logging them, but in a different scenario you can use them for a different purpose. The log will return an object just like this :
 const model = new ChatOpenAI({
     openAIApiKey: this.configService.openai_key,
     modelName: 'gpt-3.5-turbo-1106',
     callbacks: [
       {
         handleLLMEnd(output) {
           console.log(output.llmOutput);
         },
       },
     ],
   });
   {
     tokenUsage: {
  	completionTokens: 71,
        promptTokens: 1178,
	totalTokens: 1249
        }
   }
Create the prompt
The easiest way to create a prompt and use it for our chatbot is to retrieve one that is already prepared for us. In this case, we are using the “hwchase17/openai-tools-agent” prompt. To see the real implementation of it, you can check the OpenAI tools agent prompt.
   const prompt = await pull<ChatPromptTemplate>(
         'hwchase17/openai-tools-agent',
   );
Create the agent
The next step is to create an agent. In this case, we will build an OpenAI Tools Agent using a method very similar to its name. If you decide to create another agent type, you can do it using another method. Usually the methods have almost the same name as the agent type that you want to use.
CreateOpenAIToolsAgent needs the model, prompt and the tools. Tools are a special attribute of agents that give them extra abilities to perform functionalities that a normal chatbot can not. Since we are using an agent we must specify at least one tool so that our agent can use it.
 const tools = [searchTool, retrieverTool];

   const agent = await createOpenAIToolsAgent({
     llm: model,
     tools,
     prompt,
   });
The first tool that we want to use is Tavily. It enables us to search on the Internet for possible pages and content that we want to find. This is helpful when we want to search for information that the model does not know. ChatGPT has knowledge for events that have happened up to January 2022. If we want to know about events that have happened after that time, Tavily is a great option . For example we can use Tavily to find the current temperature in Las Vegas.
   const searchTool = new TavilySearchResults({
     apiKey: this.configService.tavily_key,
   });
Creating a custom tool
What if we want to find very very specific data? Let’s say we want to find the employees of a software company. Tavily for sure would face some problems about this problem. For this, we can create our own tool that will help us retrieve information about a specific page.
The first step consists of retrieving the information from the web page where we want to extract the data. As mentioned before, in this article we will give our chatbot some data about the staff of a software company named Softup. The necessary information is found on their official website, in the “/about” route. Think of this as a form of training. We will use Cheerio for this purpose.
const loader = new CheerioWebBaseLoader('https://www.softup.co/about');
   const docs = await loader.load();
   console.log('Page content :', docs);
All we have to do is specify the name of the route in the CheerioWebBaseLoader class. It will give us a loader that we can load to get the content of the page. The webpage content will be inside a particular object type called Document. Our log looks like this :
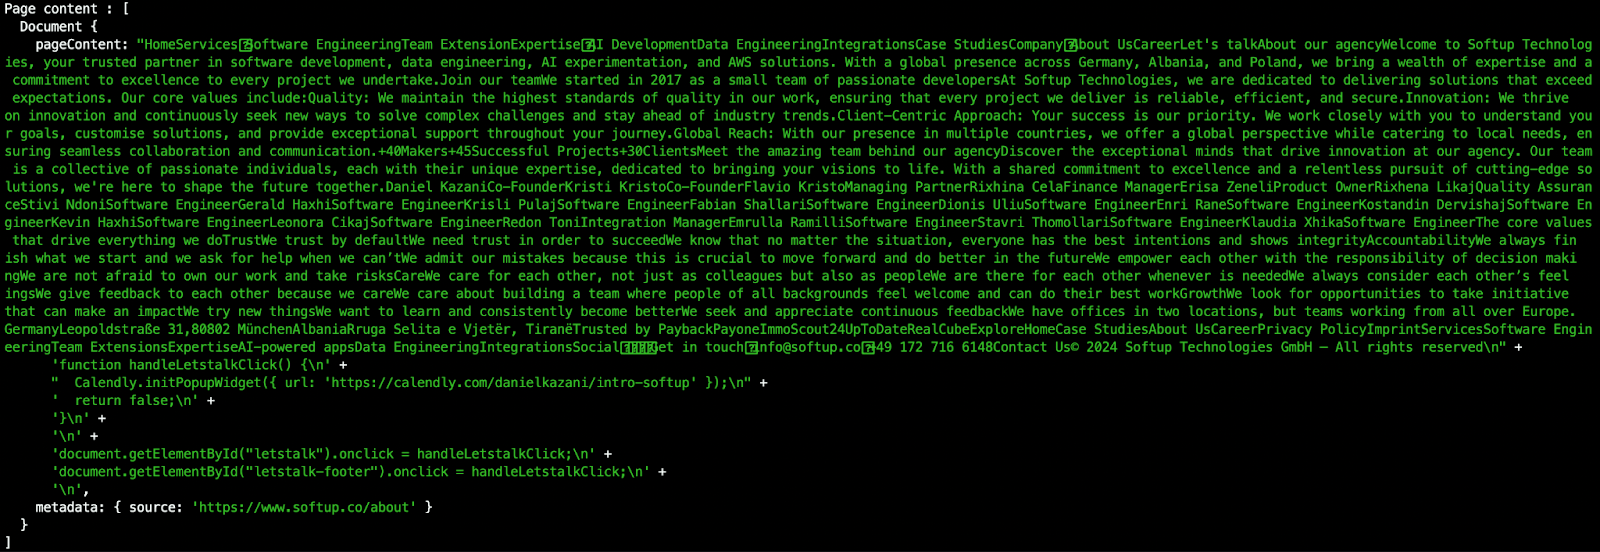
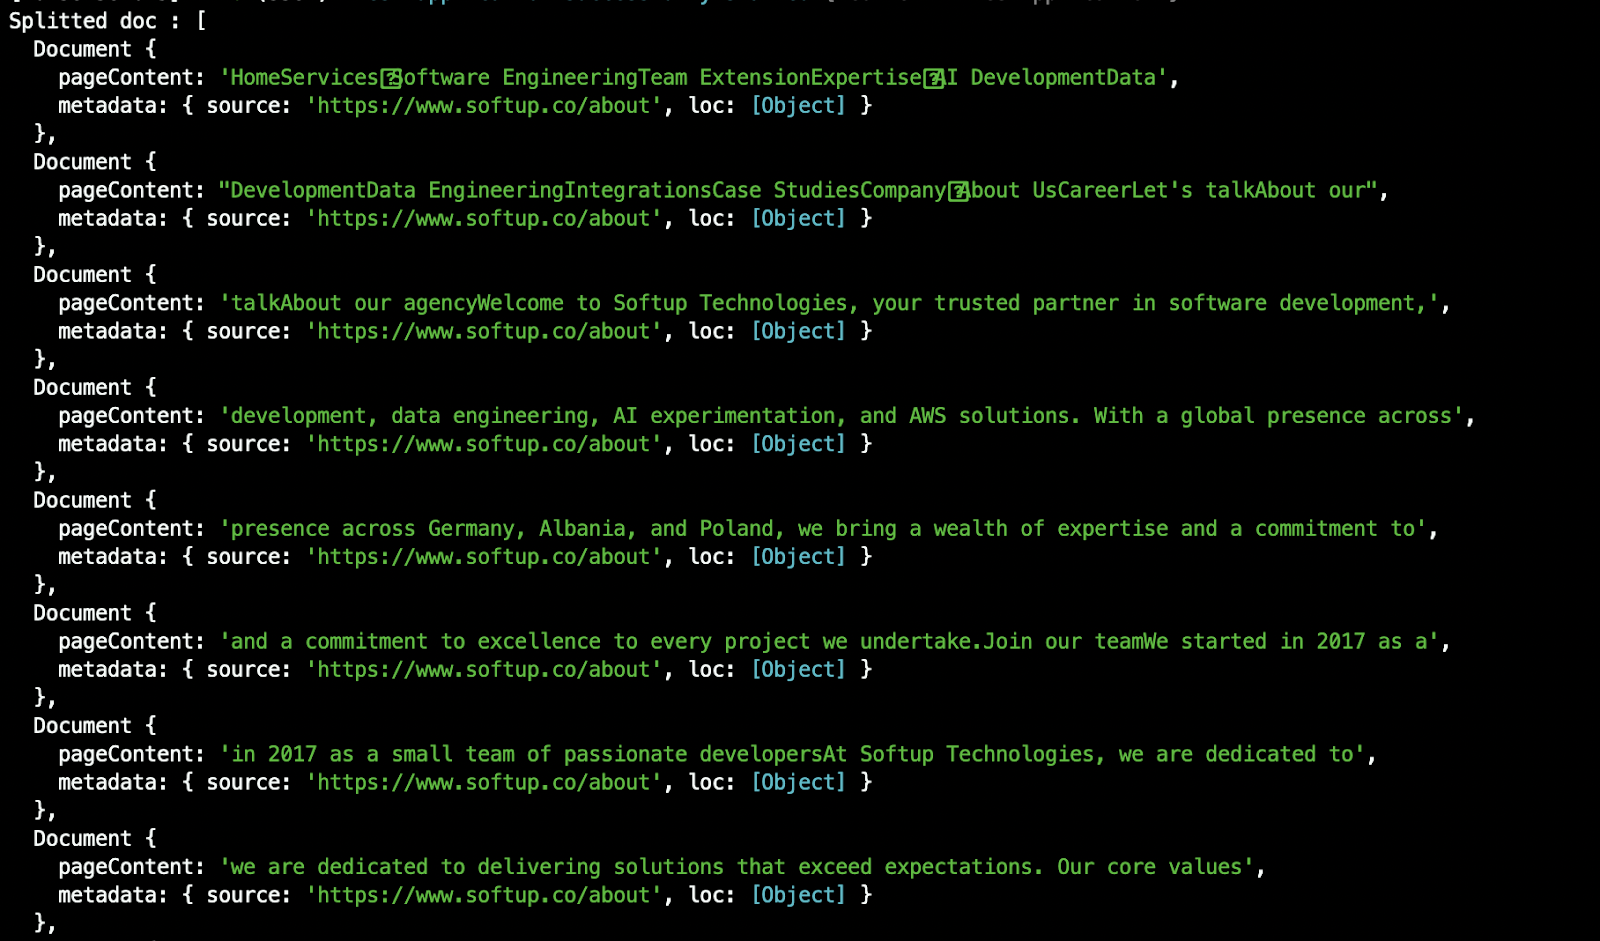
However, as you might probably see, there is a huge issue with this content. It’s too big. If we put this whole text content in our prompt or if there are multiple pages where we want to retrieve from, we would for sure easily exceed the context limit. For this reason we have to divide the text, the big document in smaller chunks, into smaller documents. How can we split this document in smaller pieces? Well, there are multiple options and algorithms to split a doc. One way is using a recursive character splitter.
   const splitter = new RecursiveCharacterTextSplitter({
     chunkSize: 100,
     chunkOverlap: 20,
   });
   const splitDocs = await splitter.splitDocuments(docs);

   console.log('Splitted doc :', splitDocs
Here is our log. The whole big text is split into smaller documents that can be managed easier. Splitting a doc into a smaller document with less data is super important, because each of these chunks will be saved in a vector database. So each document will be converted into a vector. A fair question would be “Why don’t we store the data as a text?”. Well, if we embed our doc into a vector it will be far easier to retrieve data based on similarity. So if the user asks for one of our specified company members, it will be easier to find a vector that is “near” our query vector. In short words, mathematically, searching by similarity is done easier using vectors than just plain text.
Now that we have the docs in the exact size that we want, it’s time to store the docs in a vector database. In this article we will use Pinecone. All we have to do is configure Pinecone with its API key, specify what strategy we will use to convert the data into a vector. We can use OpenAIEmbeddings for this purpose. Then we specify the index where we will store our vectors and use the fromDocuments method to store the data into Pinecone. This method will only need the split docs that we created, an embedding strategy and configuration.
const pinecone = new Pinecone({
     apiKey: this.configService.pinecone_key,
   });

   const embeddings = new OpenAIEmbeddings({
     openAIApiKey: this.configService.appConfig.openai_key,
   });
   const pineconeIndex = pinecone.Index(this.configService.pinecone_index_name);

   await PineconeStore.fromDocuments(splitDocs, embeddings, {
     pineconeIndex,
   });
Right now, we have stored the data in Pinecone successfully, but will we upload our data for each chatbot call? No, that would be a terrible solution due to unnecessary time and resource consumption. Instead, we can load the vectors directly from Pinecone. We can do this via the fromExistingIndex method.
 const vectorStore = await PineconeStore.fromExistingIndex(embeddings, {
     pineconeIndex,
   });
   const retriever = vectorStore.asRetriever({ k: 3 });
   const retrieverTool = createRetrieverTool(retriever, {
     name: 'retrieve_company_info',
     description: 'Retrieve information about possible employees of Softup      Technologies. For any questions, use this tool!',
   });
Then from this store, from this data that we get, we create a retriever. A retriever is an interface that returns documents based on an unstructured query. It helps you search and retrieve information from your indexed documents. We can use this retriever as a tool for our agent. The property k allows us to retrieve the three most relevant and similar vectors to our query. We also give it some extra information such as name and description, so the agent knows what this tool is for. So each time there will be an input about possible employees, the agent will use the retrieverTool. After creating our tools, it’s time to make some calls to our agent.
Creating an agent executor
After creating the agent, we need to create an agent executor that will allow us to call the agent. We can create it easily by just putting inside the AgentExecutor the basic configuration such as the agent and the tools that we tend to use for our chatbot.
 const agentExecutor = new AgentExecutor({
     agent,
     tools,
   });

   const input = 'Who is Enri Rane?';
   const response = await agentExecutor.invoke({
     input,
   });

   console.log('The chatbot response :', response);
   return response
;
Let’s ask the chatbot the question “Who is Enri Rane?”. If we ask the OpenAI about this employee, it won’t recognize him, but with our custom retriever tool it should give us a correct answer. Here is what we get :

Adding memory
At this moment, our chatbot can respond to us about given or “trained” data and also give us information of things that are currently happening via Tavily, but if we ask about our previous or first question, it won’t know about it. In other words, the chatbot does not have a memory. Let’s see it closely.
 const firstInput = 'Hi, my name is Diana! Who is Enri Rane?';
   const firstResponse = await agentExecutor.invoke({
     input:firstInput,
   });
 console.log('The first chatbot response :', firstResponse);

  const secondInput = 'What is my name?';
   const secondResponse = await agentExecutor.invoke({
     input:secondInput,
   });

   console.log('The second chatbot response :', secondResponse);
First, we introduce ourselves with a name and ask him about the employee. Then we ask another question that has to do with information given in the first invocation, but it will respond that it does not know.

To give memory to the chatbot, there are different options. In this article, we will use Upstash-Redis.
const upstashMessageHistory = new UpstashRedisChatMessageHistory({
     sessionId: fjdskdso2993jifj!@ed1331,
     config: {
       url: this.configService.appConfig.upstash_url,
       token: this.configService.appConfig.upstash_token,
     },
   });
To use Upstash we first need to create an account. We can do it easily in just a minute on the Upstash website. Also we need to specify the sessionId that is going to be used to recognize the user the conversation is held with.
The next step is to specify a memory strategy that we will use. In Langchain we have BufferMemory that allows for storing of messages, then later formats the messages into a prompt input variable, ConversationMemory that creates a summary of the conversation and even CombinedMemory to combine multiple memory types. For more information, check Memory types.
 const memory = new BufferMemory({
     returnMessages: true,
     memoryKey: 'chat_history',
     chatHistory: upstashMessageHistory,
     inputKey: 'input',
     outputKey: 'output',
   });
We now have to add to the agent the ability to remember/have this memory. We can do it by just adding or returning the chatHistory property of the memory in a new runnable that allows us to keep track of the history.
const agentWithChatHistory = new RunnableWithMessageHistory({
runnable: agentExecutor,
inputMessagesKey: 'input',
historyMessagesKey: 'chat_history',
getMessageHistory: async () => {
return memory.chatHistory;
},
});
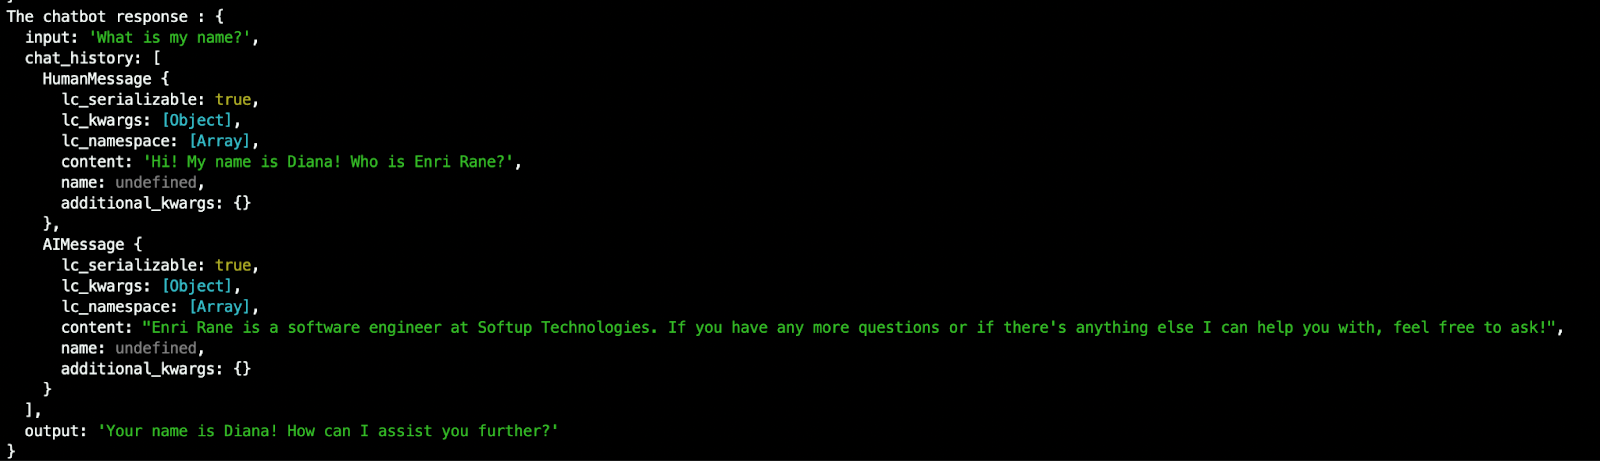
const response = await agentWithChatHistory.invoke(
{
input: 'Hi! My name is Diana! Who is Enri Rane?',
},
{
configurable: {
sessionId: 'fjdskdso2993jifj!@ed1331',
},
},
);
console.log('The chatbot response :', response);Let’s hit run to see what we get in our first question.

Let’s ask the chatbot about the provided name.
const response = await agentWithChatHistory.invoke(
     {
       input: 'What is my name ?',
     },
     {
       configurable: {
         sessionId: 'langchain-test-session',
       },
     },
   );
As we can see, now we get the answer from our chatbot for our name, information that was provided in the first question. This means that our bot can remember.
Full final code
async permanentMemoryWithRetrivaToolAgent() {
   const model = new ChatOpenAI({
     openAIApiKey: this.configService.appConfig.openai_key,
     modelName: 'gpt-3.5-turbo-1106',
     callbacks: [
       {
         handleLLMEnd(output) {
           console.log(output.llmOutput);
         },
       },
     ],
   });


   const searchTool = new TavilySearchResults({
     apiKey: this.configService.appConfig.tavily_key,
   });


   const upstashMessageHistory = new UpstashRedisChatMessageHistory({
     sessionId: 'fjdskdso2993jifj!@ed1331',
     config: {
       url: this.configService.appConfig.upstash_url,
       token: this.configService.appConfig.upstash_token,
     },
   });


   const memory = new BufferMemory({
     returnMessages: true,
     memoryKey: 'chat_history',
     chatHistory: upstashMessageHistory,
     inputKey: 'input',
     outputKey: 'output',
   });


   const embeddings = new OpenAIEmbeddings({
     openAIApiKey: this.configService.appConfig.openai_key,
   });


   const pinecone = new Pinecone({
     apiKey: this.configService.appConfig.pinecone_key,
   });


   const pineconeIndex = pinecone.Index(this.configService.pinecone_index_name);


   const vectorStore = await PineconeStore.fromExistingIndex(embeddings, {
     pineconeIndex,
   });
   const retriever = vectorStore.asRetriever({ k: 3 });


   const retrieverTool = createRetrieverTool(retriever, {
     name: 'retrieve_company_info',
     description:
       'Retrieve information about possible employees of Softup Technologies. For any questions, you must use this tool!',
   });


   const tools = [searchTool, retrieverTool];
   const prompt = await pull<ChatPromptTemplate>(
     'hwchase17/openai-tools-agent',
   );


   const agent = await createOpenAIToolsAgent({
     llm: model,
     tools,
     prompt,
   });


   const agentExecutor = new AgentExecutor({
     agent,
     tools,
   });


   const agentWithChatHistory = new RunnableWithMessageHistory({
     runnable: agentExecutor,
     inputMessagesKey: 'input',
     historyMessagesKey: 'chat_history',
     getMessageHistory: async () => {
       return memory.chatHistory;
     },
   });

    // const response = await agentWithChatHistory.invoke(
    //   {
    //     input: 'Hi! My name is Diana! Who is Enri Rane?',
    //   },
    //   {
    //     configurable: {
    //       sessionId: 'session_id',
    //     },
    //   },
    // );


   const response = await agentWithChatHistory.invoke(
     {
       input: 'What is my name?',
     },
     {
       configurable: {
         sessionId: 'fjdskdso2993jifj!@ed1331',
       },
     },
   );


   return response;
}